If you came here from within wildwestcycle.com this is a new window. When done reading, just close this one and you'll be back where you left from.

If you came here from outside wildwestcycle.com and would like to see more of the site, you'll find a link at the bottom of this article.


I'm about to tell you of a trick I use to time my scooter entirely from the right side, as a one-man operation. I have a Crane Hi4 ignition and these photos are of that. Yours may be different, but with what you see here you may be able to grasp the concept and adapt it to your particular situation.

Dialback timing light.
If you don't know what I'm talking about when I say "dialback timing light" close this page right away and go look at the Jokes or the Talk Around the Fire section . This is beyond your current competency and you stand a good chance of screwing it up. Which is not to say you're stupid. You just need to learn more first.

I did not invent this trick. It was related to me by a guy (his shop calls him the "Guru") who works for one of the major aftermarket performance parts company. Because of potential liability issues, he asks not to be identified. I will honor that request, but we owe him a big "Thank you!".


What you are going to do is mark the edge of your ignition trigger cup. The mark will become your new timing mark that you will use instead of the mark stamped on the flywheel.

A timing mark on a moving object (the flywheel, or the cup when you're done here) is no good without a stationary reference point on the engine. In the case of the normal way to time your engine that reference mark is not really a mark, it is the hole in the left engine case - you center the timing mark in that hole. Your new reference point will be the left screw that secures the points plate. Once you have those two marks in place you use a dialback timing light to time the engine.

Your first, very first, step is to bring the front cylinder up to Top Dead Center on the compression stroke and static-time the engine following the instructions that came with your ignition system. I'll leave it to you to use whatever technique works for you; just make sure you are on the compression stroke, and that it is the TDC mark showing in the timing hole, not the advance mark.

The Black Box

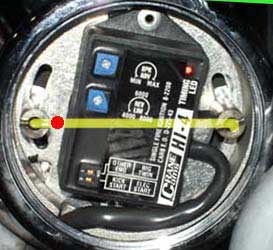
Take the ignition cover plate off. This is what you'll find inside the cone. If you have an ignition with an external black box, like the Crane Hi4E, you'll find just a timing plate with no black box. This trick works just the same, regardless of where the black box is. It will NOT work with a Dyna or any other ignition that uses a mechanical advance.

Don't look for the yellow line and red dot in your engine - that's something I added to the photo for illustration purposes ( That's a joke, guys. I know you're not really looking for the yellow line in your engine. You're not, are you? If so, see the instructions above about closing this page . . . )

That yellow line is important - it marks a straight line between the two posts that secure your timing plate. Draw that line with your imagination on the timing plate assembly and make a mark just about where I have placed the red dot. You are about to drill a hole there AFTER YOU TAKE THE PLATE OUT! You hear me, you hillbilly?! Take the plate out first!

Don't try to drill it with the plate still mounted. If you do, you'll wind up buying yourself a new timing cup. You don't have to disconnect the wiring and take the plate to the drill press, you can just pull it out of the case as far the wire lets you and use a hole shooter on it, but you're about to do something that you can screw up. For instance, you don't secure the plate before you drill it, and the bit grabs as it punches through and spins the plate out of your puny grasp and turns the wire up into a coil that looks like a spring before it breaks loose and ruins the ignition. BE CAREFUL and if you don't know what you're doing, FORGET IT!

Now do it. Drill about a 3/16ths to 1/4" hole. Up to a point, the diameter doesn't matter.

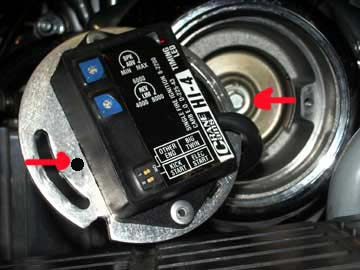
Note the photo. In the background you see the cup, with a small bolt in the center. You are going to take that bolt out and remove the cup, but not yet. You hear? NOT YET.

Once you've drilled your hole, put the timing plate back in place, exactly where it was, with your new hole on the imaginary yellow line between the posts. (The photo below does not show it that way. That is an error on my part and you should ignore the position shown in the photo. The hole should be on the imaginary line.)

Timing Plate Out
When you look through the hole you should see the edge of the timing cup. Doesn't matter if it's exactly centered over the edge of the cup. It's nice if it is, but it's not critical. If you can't see it because you drilled too far to one side or the other, just pull the plate again and use a small file to "stretch" the hole in the direction it needs to go to let you see the cup.

Take a Sharpie marker and through that hole put a mark on the edge of the timing cup. The mark must be on the line between the two posts - that is, on the imaginary yellow line in the photo. That's going to become your new timing mark, once you make it permanent.
(It would be a good idea now to confirm that your front cylinder is at Top Dead Center of the COMPRESSION stroke.)

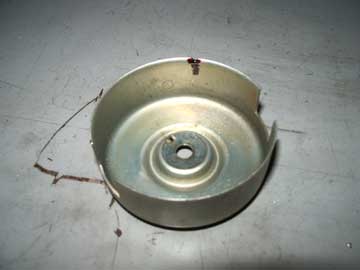
Once you've marked the edge of the cup with a marker you have to make the mark permanent, so pull the timing plate out again. Remove the bolt from the center of the timing cup and pull the cup out. This is what you'll see.

CAUTION!
I want you to pay attention now, dammit! Note that there is a notch in the end of the shaft, and a tooth on the back of the cup. When you put this thing back together make sure, REAL sure, that the tooth is set in the notch. That is what indexes your ignition to the crank, and it is possible to replace the cup with the tooth not in the notch, then to tighten down the bolt, flattening the tooth.

The cup will be cocked, though, and it won't fit into the sensors on the back of the timing plate. That ought to be a clue that something is wrong, but oh, no . . . some guys can cross-thread a ketchup bottle, and they are the same ones who'll force stuff until it breaks. This is a likely place for them to work out.
Okay; there's the cup with the mark you made right on the very edge. To make it easier to photograph, and easier for me to work with afterwards, I drew the mark a little bit on the inside of the cup.

Take a small triangular file or a Dremel tool grinder or something and lightly notch the edge of the cup - just a little bit will do; don't get carried away, and be very, very careful not to bend the edge of the cup. Once you have it notched, find some real bright paint, red or yellow are good, and fill in the notch. Then a dab of white on either side (which I didn't do, but should have) will make it stand out real nice.

Check again to be sure your front cylinder is still at TDC. Reinstall the cup (careful, dammit!), then reinstall the timing plate with the new mark on the cup showing through the hole you drilled. The hole and the new mark ought to be lined up with the left post, directly on the imaginary yellow line.

Now, through the magic of modern electronics, you can use a dialback timing light to set whatever degree of advance you want. Dial that number into the light, fire up the engine and set it to 2,500RPM, then turn the light on to the hole. If your engine's real timing matches what you dialed into the light you will see the new mark on the cup showing through the hole directly beside the post (which I left out of this picture, but its hole is there).

( The RPM level is important! You MUST be running at maximum advance when you time it, and by 2,500RPM most electronic ignitions are there. With a Crane ignition if you aren't at 2,500RPM you will get increasing advance variations for every bit that you are off that number in either direction. It matters; make sure.
ALSO - if you do not run a VOES you should do whatever your ignition instructions call for to make it advance. On a Crane, that means ground the green wire from the black box. The instructions tell you that it should normally be taped off it you don't have a VOES - if it is, untape and ground it. When you're done, tape it up again.

Once in a while your timing may be out of adjustment enough that you can't see the mark in the hole. You know it's somewhere around there, but you can't find it. If you run into that situation (or if you just want to make it easier to find a wandering mark when you begin this mod) go back to the step shown above where you've pulled the cup out and marked the edge.
Mark the cup BEFORE you do what I'm about to describe or you'll lose some accuracy in the mark.
After you've marked the cup, but before you reinstall the timing plate, extend the hole in in the plate in each direction along the curve of the cup. You can drill another hole on each side of the one you just made and file them until all three are one long slot, or you can just file the first one until it's as long as you want; doesn't matter which. Don't make it wider, make it longer. That'll give you more viewing area to see the mark. Remember, though: when you time it, you want to adjust the mark until it is opposite that left-side post, NOT until it's centered in the hole you made.

Good luck.

Pilgrim


TOP
If you came here from outside Wild West Cycle
and want to see more of the site, click HERE.

If you came here from within Wild West Cycle
just close this window and you'll be back there.