mileage in the mid-30's at high cruise, not nearly enough for long
runs out west. The answer was a big tank, and this is it; 6.1 gallons. That's a 200+ mile range; enough.
The profile of the tank is unchanged, but it is two inches wider, gaining a gallon and a tenth over the unmodified capacity.

|
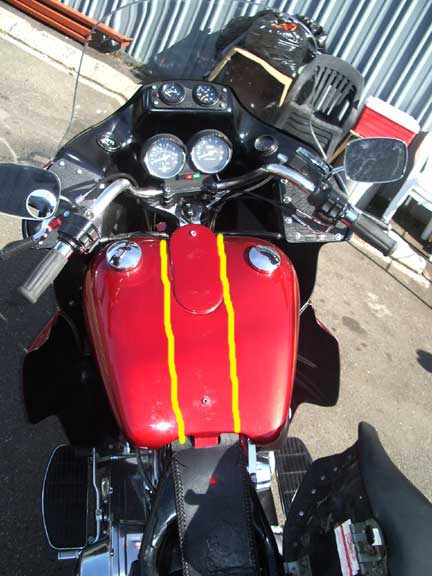
I split the tank lengthwise on each side of the center section. You're seeing the completed job, but I've marked the cut lines in yellow on the photo. I welded a 1" extension onto each side of the center section and then welded the outside sections to the new metal. (Well, actually I had a pro welder friend of mine do it - I'm just not that good working with sheet metal and an arc.) Then I cut off the RK dash brackets and he welded on a couple of 1/4 x 20 nuts fore and aft. I dimpled the metal where I wanted them about half of the nut's thickness before the nuts went on. In the next photo you'll see why the nuts are there.
|
<
|
||
|
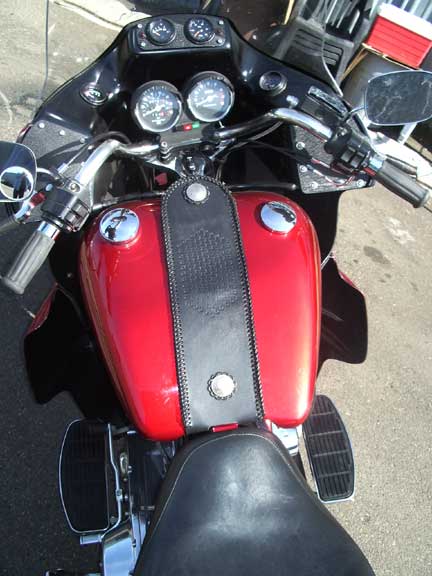
With nothing to visually break the expanse of steel the tank looked wide enough to land light airplanes on, so I made up the dash panel you see here. Note that it's held on by silver dollar conchos; they match the coins that anchor the straps on my saddlebags. The coins have a 1/4 x 20 stud on the back that threads into the nuts on the tank. A leather concho under the silver adds a nice touch. Put small washers on the stud to make it thread in the right depth so the coin is oriented correctly when it's screwed all the way in. Having the nuts set in a dimple, and a little added leather thickness from the leather concho makes it possible to screw the silver concho down far enough that the edges contact the leather. If you don't countersink the nut a bit, the edges will stand proud, away from the leather. Don't use any Loctite on it or you'll play hell getting it out when the time comes. (See final note about making the conchos, and for another use for the nuts.) Look closely at the back end of the tank. You can see (barely) that the end of the panel has two longer pieces that wrap down around the end of the tank. They are a couple inches long, and fastened to the tank with velcro underneath. The front of the panel has a another piece laced on, oh, call it a "stirrup," that drops down in the shape of a shallow V across the front of the center section of the tank. Those two pieces keep the ends of the panel from curling. |

|
|
|
What would I do different next time? Just two things, maybe just one.
|
||
|
MAKING CONCHOS It's a piece of cake with a shop press. You could probably do it with a hammer, too, but better with a press. You need a base that will support the edge of the coin while the center is pressed down. In one of those cosmic coincidences, it turns out that the outer race from an old Harley wheel bearing is just right. Center the coin on the race, then press the center down as far as you want. Depending on the shape and diameter of the end of the ram on your press you might need to put a nut or something on the center of the coin to concentrate the force there. You probably ought to anneal the coin first; I cracked a couple out of the first half-dozen I made. They get work-hardened when they're stamped, I guess, so soften 'em up. Then get out your propane torch and silver solder either a stud or a bar to the back. A bar, soldered at each end while laying across the coin, gives you something to run a thong behind to lash it on to something. GEEK ALERT GPS Mount I confess: When I'm on a long trip I use a GPS; I've always got it with me, and I use it frequently. It's handy to keep track of where you are, how far it is to the next gas, and what time you'll get where you're going. Some trips, all that doesn't matter, but other times I'm running to a schedule.
When I decide to use my GPS I spin out the front concho and replace it with a ball mount
|
||
|
If you have come to this page from another site, and if you want to see more of wildwestcycle.com, click HERE |
||
 for my GPS bracket, which is exactly why I selected 1/4 x 20 nuts - that's the size of the stud on my ball mount.